
How to optimise images for the web is something that comes up with my clients on a regular basis.
For the last few months I have been helping out my awesome website mentor Vicki Jakes in her Membership Group, Supercharge your Website on Facebook. I help coach other small business owners on website design and using the Divi theme.
One of the things that comes up on a regular basis is how they should optimise images for their website.
It can be pretty confusing trying to understand the difference between pixels and points, JPGs and PNGs. What actually makes one file type more suitable than another for a specific end use? There seems to be a lot of jargon involved which I have tried to simplify below.
Why Is It Important To Optimise Your Images?
There are a few reasons that it’s important to optimise your images for the web.
1. Site speed.
Getting your images right BEFORE you upload them to your site can be a key factor in improving site speed, especially if you have a lot of images for a portfolio or ecommerce site.
If your images have a really large file size then this can really slow your site down.
Sure there are plugins for WordPress like Smush that will optimise your images. But a good habit to get into is to standardise your images prior to uploading.
2. User experience.
Conversely, if your images are too small / low resolution, they can look blurry when used for larger images on your site. This will make your site look low quality and people will move on.
3. SEO
Google loves a fast site! Fast loading images are more likely to rank higher in image searches and this can improve your over-all SEO ranking.
What Do You Mean By “SIZE”?
When we talk about the size of an image, people often think of it in spacial size: cm, inches or pixels.
But the most important factor is the ‘file’ size of the image. This is what takes up room on your server and affects your site speed.
This number, expressed in kilobytes (kb) or megabytes (mb), is affected by the spacial size AND the quality of the image, often called the “resolution”. The higher the resolution, the more information is stored in the image and the higher the file size will be.
The ideal file size for an image should be as little as possible. Unless you are uploading huge and detailed images you should be able to reduce them to under 200 kb.
What the heck is DPI?
When editing an image, the resolution is often referred to as DPI = Dots Per Inch. This means the number of points that are rendered into one inch. What gets complicated is that those dots are sometimes called pixels, especially when referring to screens… confusing right?
In simple terms, this means the level of detail that is contained within the image. So, more dots per inch, more information needs to be stored = bigger files size.
Most camera phones now take VERY high resolution images. If you have had professional photos they will likely be even higher!
This is great if you want to print a photo of your family on a large canvas to hang over the fire place. But a HUGE waste of server space if you are using the image on a screen.
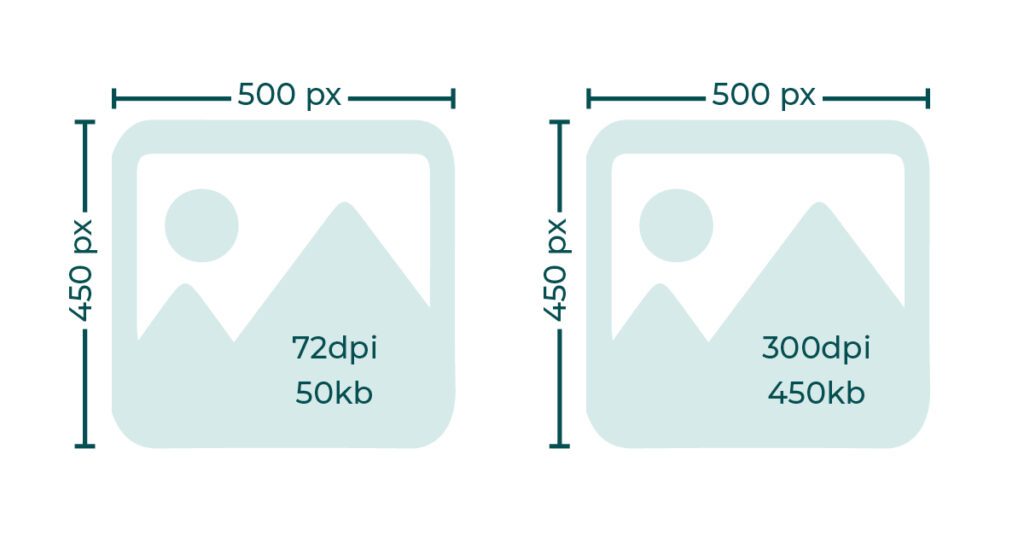
The reason for this is that screens (and therefore website and social media sites) can only show images at a maximum of 72dpi because that is how many dots (pixels) there are per inch on a screen! All the other information with still be stored but in effect with be ignored and wasted.
So always make sure you images have a DPI of 72.


A note about DPI…
I know we are talking about website images here. But the flip side of this is that most printing requires a minimum DPI of 300.
So if you will ever need to print your images then make sure you keep a high resolution original. Once you have reduced the DPI for web they may not be suitable for printing.
Facebook automatically reduces the DPI of image that are uploaded to it. So images downloaded from there are also usually too low res to print well.
Different Sizes For Different Usage?
If you know the specific use for an image then you can make sure that the spacial size is correct. This ensures your site is not reducing down unnecessarily large images (or upscaling smaller ones)
Images for full width banners, gallery images, blog images, product images/headshots all have ideal sizes. As a general rule I size my images as follows:
Fullwidth header: width 2500 px (depth depends on image) – Images that will be displayed across the full width of the screen.
Gallery images: width 1500 px (depth depends on image) – Images that will be enlarged in a lightbox.
Static blog images: 1200 px
Product images: 750×750 pixels. (this is on the large size, I manage websites with 450/500 pixel product images that work just fine)
Every site will have slightly different requirements but it worth find images that work and noting their (pixel x pixel) sizes for future ref
Different File Types: JPG or PNG?
When you are saving an image you have to choose a file type. There are several option but here are the most common:
JPG: are the standard for most image uploads as they compress the file to a manageable size with little loss of data. JPGs work for most purposes except for images that require a transparent background like your logo or favicon. They allow relatively high quality images for the lowest file size.
PNG: as mentioned above when a transparent background is required then a PNG can be used. PNGs are not as compressed as JPGs so they have larger files sizes and should only be used when necessary.
GIF: also compresses the file size but the colour range is not as suitable for photography. However they can be useful for adding animations to a site.
TIFF: are the gold standard when it comes to quality of image but that comes at the cost of large file sizes. Photographers often provide images as TIFFs for this reason but they are not really suitable for websites.
In short:
- JPGs as standard
- PNGS sparingly for logos and icons.
- GIFs for animation.
- TIFF: for print only
Colour Optimisation: CMYK or RGB?
Another factor that affects the size of your images is the colour mode. Printed colour (CMYK) and on screen colour (RGB) work on completely different system which I won’t go into right now…
But as you can see from the name there is an extra bit of information for very single pixel with CMYK. Your website only requires RGB so ensure your images are saved as such to reduce their size.
This is also important for flat graphics/PNGs/logos as CMYK settings can make your carefully chosen colours look completely wrong as the screen tries to convert them to RGB!
Image Optimisation Tools
As a Graphic Designer I tend to use software like Photoshop that can batch optimise my images for me. And sometimes I use Mac Preview for one-off images.
However I know not everyone has access to these. So I put a shout out to the lovely folks of the Supercharger Membership to asked them what they use to optimise images for the web. Here is a round up of their recommendations:
Gimp
Freelance Writer Louise Tondeur said she also used Photoshop and Preview but also recommended open source app Gimp for image editing.
Tinyjpg
Lyndsey Cribbs Of Cribbs & Co Babywear uses Tinyjpg.com to compress her images before uploading them to her site.
BeFunky
Miranda Luck, animal welfare expert and owner of Wrapsio.com, uses Befunky.com because it is super simple to use and it’s free!
Pixlr
Vicki Jakes recommends using Pixlr.com so I am going to check this one out myself later!
Canva
Members Sarah Latham from Friends and Canines, Karel Wells from Tommy Bobbins and Marie Parton of The Social Ad Squad said they all use Canva to make the images the correct spacial size for each usage. You can also adjust the quality output which reduces the resolution and file size.
Pine Tools
Pinetools.com has a wealth of image manipulation tools within it one of which you can use to batch resize your images and edit them in lots of different ways.
TO RECAP: Optimise images for the web
- Resize to ideal size for use.
- Ideal resolution = 72 dpi
- Ideal file size = less than 200kb
- Ideal file type: JPG
- Ideal colour mode: RGB
A note about printing photos…
I know we are talking about website images here. But if you will ever need to print your images then make sure you keep your larger sized higher resolution images somewhere safe. Printing the ones you have reduced for the web will likely result in blurry low quality images!
Facebook automatically reduces the quality of image that are uploaded to it. So images downloaded from there are also usually too low-res to print well and increasing the DPI again will not help as that information has been removed from the file.
So I hope that’s given you a better understanding of image settings and optimisation plus some tools to help you.
If you have any recommendations or questions, just drop them in the comments! Or you can contact me here… Say Hello
And if you need more support on a regular basis then I can highly recommend Vicki’s Membership* if you aren’t already there.
*This is an affiliate link but, as you know, I genuinely think it’s fabulous!!
Excellent advice here Sally, gonna bookmark this for future reference!!
Thanks Emma, I am really glad it’s helpful 🙂
Fantastic information in this blog. So very useful. Thank you!
Thanks Miranda, I am delighted that you think so. 🙂
This is brilliant, Sally. Thank you so much!
I’ve book marked it as I’m going to refer back to this when I eventually get round to optimising my site!
I am so glad it’s helpful! When are you going to do that then? 😉
This makes so much more sense now, thank you
You are so welcome Lisa! Glad it was helpful. 🙂
Thanks for putting a great article together Sally. This comes at just the right time for me. As I’m fine tuning speed on a client site with loads of images on it. Also relieved to know that I’m on the right track with using canva 🙂
Ace! Great to know it was helpful. Good luck with the site speed. 🙂